Hiding Switches and Fill Valves
This is probably yet another "anal rententive" trait of a scale builder, but I didn't want to have any of my plethora of switches and fill valves showing to blemish the scale appearance of my SBD. This task is always harder than it sounds.
Finding some way to hide them, yet make them easily accessible is the first hurdle. Next thing is that I always like to mount them in such a way that I will be able to easily remove them to replace them and/or their respective wires/hoses for regular maintenance and troubleshooting. Then you have to make sure that items related to the engine/ignition are 12-14 inches away from anything that is connected to your receiver. That big ol' "deadzone" seems huge when your dealing with a 1/6 scale plane... especially when you have a full cockpit stealing most of the fuse area.
So, I had to compromise somewhat in some areas, but overall I think I came up with some solutions that hide the majority of my switches and fillers but kept their functional integrity intact.
|
NOTE: To fabricate all the hatch doors, I used the same glass & ply layup technique that I used on my retract access hatches.
|
Receiver & Air System hookups
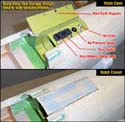
Originally I had planned to put these fittings in a scale hatch for the life raft on the side of the fuse. Instead of cutting through the fuse stringers for a hatch that limited me on space, I had an epiphany... the rear gun trough! I don't know why I didn't think of this earlier, but it has a lot more space, and I don't have to weaken the fuse by cutting out additional stringers. Here's how I proceeded...

 |
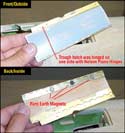
The SBD had a "trough" in the top of the turtledeck area where the rear seat gunner could store the twin 30 cal machine guns when not in use. This area was covered by two "barndoor" style hatch doors in full scale, but I elected to join them into one single door that would be detailed to "look" like the barndoor hatch.
First off, I had to cut out the existing fuse sheeting where my previous "static" hatch doors for the trough were. Next, I cut an opening in the bottom of the trough to allow my wires and hoses to pass into the fuse under the cockpit floor. I want all switches to be mounted to removable plates so I can pull the systems out to replace switches, wires, hoses, etc. for maintenance, so this is where I fabricated the mounting plate and associated mounting blocks.
 My hatch is held down with an interlocking system and a 4-40 screw. Next, I built a single hatch door that looks like a double-door, with scale looking piano hinges on each side. Only one side is functional, the other is cut in half lengthwise to reduce weight. I added the extremely strong "Rare Earth Magnets" from Radio Shack to latch the hatch down. My hatch is held down with an interlocking system and a 4-40 screw. Next, I built a single hatch door that looks like a double-door, with scale looking piano hinges on each side. Only one side is functional, the other is cut in half lengthwise to reduce weight. I added the extremely strong "Rare Earth Magnets" from Radio Shack to latch the hatch down.
The end result is a very functional design that provides hidden access to my receiver switch, charge jack, retract air filler, and air pressure gauge.
|
|
|
Gas Filler
I decided to use the scale ammunition hatch for the front twin 50 cal machine guns to hide my gas filler in. Again, I cut out the sheeting, added mounting blocks for the removable plate, and built a glass and ply hatch that was curved to match the fuse shape. I used a Rare Earth Magnet on this hatch for latching as well.
|
|
There's really no easy way to pull this hatch open with the magnet latch, so I had to add a little "grabber plate" that I could snag with my fingertp to pull the hatch open... it will look less obtrusive after all painting and detailing is done. With the plate mounted, I run a gas line through a fuel dot mount and the gas line can be easily pulled out a few inches for fueling.
|
|
 |
Engine Kill Switch
My last switch was the engine ignition kill switch. This was the hardest one to find a home for, because it had to stay in front of the firewall to avoid RF interference with the receiver. I can't mount it to, or through the removable cowl, so it had to go on the firewall somehow... and have some way of accessing it from the outside (hopefully out of sight).
|
My only solution was to mount it to a removable plate that screwed to the firewall, then attach a 256 rod to it in order to extend the switch access outside of the plane. The rod passes through a short nyrod tube on the firewall ring to keep it from rattling, and extends into the opening for one of the cowl flaps. This allows me to easily grab the end of the rod to push/pull the switch inside into the on/off position. My switch has a charge lead dangling now, I'll figure out where to run that later on.

"The Antenna Mast"
|

