Making Multiple Hatches of the Same Size & Shape
Out of 90+ hatches on my SBD, there are probably about 10-12 different shapes/sizes of hatch. Some shapes/sizes are repeated as many as 30 times on the wing. So, here's what I do...
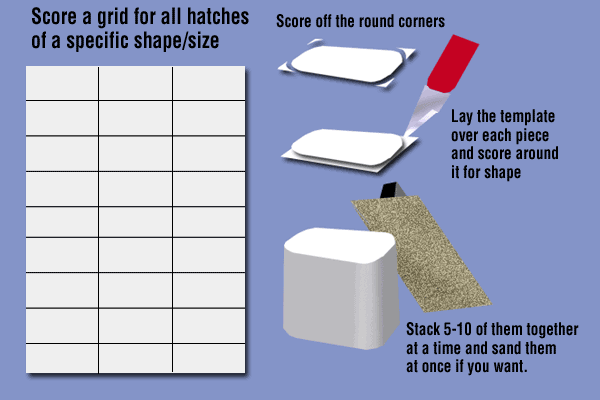
For hatches with more than 10 instances, I will draw a "grid" onto the styrene to lay out the height and width of all hatches. For example, if there are 30, I may draw a grid of 30 rectangles as 3 columns wide by 10 rows, with all being 1.5" x .75" in size. Next, I just score the styrene with the knife blade, and they all break away into 30 identical rectangles. Next, I'll shape the rounded corneres on only one of them, sand it to it's final shape and size.
Then, I take that one hatch, using it as a template, and lay it over all the remaining 29 hatches. I then use the knife to trace around the template hatch and score the rectangle blanks. The rounded corners then break off, allowing me to sand them smooth and get 30 "nearly" identical hatches. You might get a few that aren't perfect, but you can't see the difference unless they're right on top of each other.
When I've only got a few of a shape, say 5-10, I'll skip the grid step. I'll just cut the first master/template hatch, then proceed to laying it on a piece of styrene and scoring around it in 5-10 spots on the styrene and pop them out like decals. Sand each one and you're good to go.
I also found it easier to stack them all together after cutting and sand them all together at once like a stack of poker chips. This ensures that you sand them all the same amount and get the same radius on all the corners.
Just make sure you draw your panel lines first, so you are sure to cut them to the right size and put them in the right position. Take your time, it's easy to misplace them. I glued a few in the wrong spot and it's not easy to get them back off. It screws up your wing surface, so it's putty and primer again to fix the spot and move them to the correct position.
Hope this helps!
|
|
|

|

