Building Scale WheelWells from Scratch
I want to make this SBD as realistic and scale accurate as I can, so building up scale wheelwells was a must for me. I just couldn't see leaving them open, or just boxing them in. But, there are no aftermarket wells for this plane, no clue in the plans on how to make them, and virtually nothing on the web about how to do this.
So, I studied the fullscale SBD wells for a few days, and came up with a plane for scratch building the wells that worked out pretty well for this plane. Ideally, I would have liked to have molded a well, then pulled vaccuuformed wells from the molds, but I don't have access to vaccuuform equipment and I don't want to invest the time and money in making my own. Therefore, I used my own built-up technique and am quite satisfied with the results...
Getting the Basic Form
 The SBD uses the traditional "bowl shaped" wheelwell, but it only incorporates that shap into about 60-70% of the overall well, mostly the back half of it. So, I came up with a way to build a reverse "plug" of one full wheelwell out of balsa, which I then covered with Monokote, glassed, cut in half, and used the resulting glass "half bowls" to build up the remainder of the well onto. The SBD uses the traditional "bowl shaped" wheelwell, but it only incorporates that shap into about 60-70% of the overall well, mostly the back half of it. So, I came up with a way to build a reverse "plug" of one full wheelwell out of balsa, which I then covered with Monokote, glassed, cut in half, and used the resulting glass "half bowls" to build up the remainder of the well onto.
This gave me the basic contour of the well, based on the profile of one of my 5" tires, and ultimately provided me the proper curved bead/corners at the bottom of the wells. I built most of the wells out of plastic, but this curvature was something I couldn't come up with and have it follow the circular shape as well.


|
Completing the Structure with Styrene
In order to finish the balance of the well structure, and blend the "half-bowls" into it, I turned to the lightweight white styrene plastic from PlastiStruct. It comes (and I used) a variety of thicknesses and even pre-molded finishes. I used some pretty thin stuff in most areas, since I wanted to keep the weight down, and most of this was just for looks.
The process here now is to glue the styrene to the glass bowls to form a smooth circular well wall, then glue that into the back half of the wells. Then additional styrene is glued and blended in to complete the main well shape and structure. The other more open structural components were then built out of balsa and covered with the thinnest mil of styrene to provide a consistent surface texture.
I used a lot of Squadron Green & White putty to facilitate the blending. That stuff is great, dries fast, sands very easy and works well for blending. Lastly, I cut a couple pieces of styrene to make the front and back walls of the strut channels, which were glued to my retract access hatches. When the hatches are in place, it forms most of the retract strut channel, at least down to the rails.
|

|
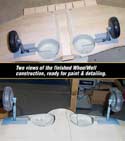
 With the structures all built up, I worked it over pretty good with putty and sandpaper until I was satisfied with the overal shape and finish. It's not as nice as the outside of the plane will be, but hey, this is after all a "wheelwell"... doesn't get a lot of visibility. With the structures all built up, I worked it over pretty good with putty and sandpaper until I was satisfied with the overal shape and finish. It's not as nice as the outside of the plane will be, but hey, this is after all a "wheelwell"... doesn't get a lot of visibility.
I think the end result is quite functional as a wheelwell in blocking most airflow from entering the interior of the wing itself, and, it looks pretty darn cool too. It's not 100% scale accurate, but good enough for me. I had to deal with and work around some of the RC Model limitations, ribs, etc., so I couldn't make it perfectly accurate, but darn close.
Once I get the final scale details, rivets, paint, weathering, etc. added... they should be quite convincing to most eyes.
|

"Hiding Switches & Fill Valves"
|

